Ever wondered how to use SSH remote on Mac for free? Well, you’re not alone. In today’s interconnected world, accessing remote servers or devices is a common need, especially for developers, IT professionals, and tech-savvy users. SSH (Secure Shell) is your golden ticket to secure communication with remote systems, and guess what? You can do it all for free on your Mac.
Let’s face it—setting up SSH for the first time can feel overwhelming. But don’t sweat it! In this guide, we’ll break it down step by step so you can confidently connect to remote servers without breaking the bank. Whether you’re a newbie or just brushing up on your skills, this article’s got you covered.
Before we dive into the nitty-gritty, let’s get one thing straight: SSH isn’t just about typing commands in the Terminal—it’s about staying secure, efficient, and hassle-free. Ready to learn how to use SSH remote on Mac for free? Let’s go!
Read also:Dean Wade The Rising Star In The Nba Landscape
Table of Contents
- What Is SSH?
- Why Use SSH on Mac?
- Setting Up SSH on Mac
- How to Generate SSH Keys
- Connecting to a Remote Server
- Tips and Tricks for SSH
- Tools and Alternatives
- Security Best Practices
- Troubleshooting Common Issues
- Conclusion
What Is SSH?
First things first—what exactly is SSH? Think of it as a secure tunnel that lets you communicate with remote servers or devices. SSH encrypts your data, ensuring that no one can snoop on your activity. It’s like having a private conversation in a crowded room, except this conversation involves code, files, and commands.
SSH is widely used for tasks like managing servers, transferring files, and deploying applications. And the best part? It’s built into macOS, so you don’t need any fancy software to get started.
Now, if you’re wondering why SSH is so popular, it’s because it’s secure, reliable, and easy to use once you get the hang of it. Plus, it’s free—no hidden costs or subscriptions required. What’s not to love?
Why Use SSH on Mac?
Mac users are in luck because macOS comes pre-installed with everything you need to use SSH. Here’s why SSH is a game-changer for Mac users:
- Security: SSH encrypts your connection, keeping your data safe from prying eyes.
- Convenience: With SSH, you can access remote servers from anywhere, as long as you have an internet connection.
- Cost-Effective: Since SSH is built into macOS, you don’t need to spend money on expensive software.
- Flexibility: SSH works with a wide range of servers and devices, making it a versatile tool for any tech enthusiast.
Whether you’re a developer managing a Linux server or a student learning the ropes of networking, SSH is your go-to solution. And hey, who doesn’t love free stuff that actually works?
Read also:Xncc The Ultimate Guide To Understanding And Maximizing Your Investment Opportunities
Setting Up SSH on Mac
Alright, let’s get our hands dirty. Setting up SSH on Mac is simpler than you think. Here’s how you do it:
Step 1: Open Terminal
First, you’ll need to open the Terminal app. You can find it by searching in Spotlight (press Command + Space) or navigating to Applications > Utilities > Terminal.
Step 2: Check SSH Installation
MacOS comes with SSH pre-installed, but it’s always a good idea to double-check. Type the following command in Terminal:
ssh -V
If everything’s set up correctly, you’ll see the version number of your SSH client. Easy peasy, right?
Step 3: Configure SSH
Before you start connecting to remote servers, you’ll want to configure SSH to suit your needs. This includes setting up SSH keys (we’ll cover that in the next section) and tweaking your SSH config file if necessary.
Don’t worry if this sounds technical—we’ll walk you through it step by step.
How to Generate SSH Keys
SSH keys are like digital keys that unlock your connection to remote servers. Generating them is a breeze, and here’s how you do it:
Step 1: Open Terminal
Yep, we’re back in Terminal. It’s your new best friend, trust me.
Step 2: Generate the Key
Type the following command, replacing "your_email@example.com" with your actual email:
ssh-keygen -t rsa -b 4096 -C "your_email@example.com"
This will generate a public and private key pair. The public key is what you’ll share with the server, while the private key stays safely on your Mac.
Step 3: Add the Key to SSH Agent
To make life easier, add your SSH key to the SSH agent. This way, you won’t have to enter your password every time you connect. Here’s how:
- Start the SSH agent: eval "$(ssh-agent -s)"
- Add your key: ssh-add ~/.ssh/id_rsa
Boom! You’re all set with your SSH keys. Now let’s move on to the fun part—connecting to a remote server.
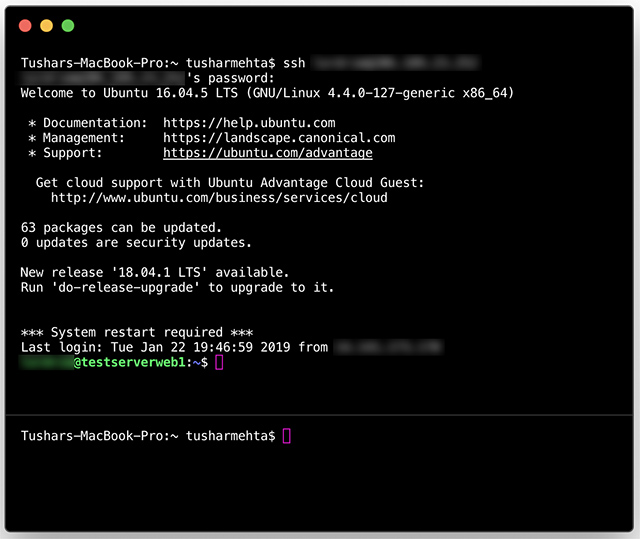
Connecting to a Remote Server
Connecting to a remote server with SSH is as simple as typing a command. Here’s how:
ssh username@server_ip
Replace "username" with your server username and "server_ip" with the server’s IP address. Hit Enter, and you’re in!
If this is your first time connecting to the server, you’ll be asked to verify the server’s fingerprint. Say yes, and you’re good to go.
Pro tip: If you’re tired of typing your username and IP address every time, you can set up an SSH config file to save your connection details. Just sayin’.
Tips and Tricks for SSH
Now that you’ve got the basics down, here are some SSH tips and tricks to make your life easier:
- Use SSH Aliases: Create shortcuts for your server connections in the SSH config file.
- Enable Port Forwarding: Use SSH to securely access services running on the remote server.
- Automate SSH Connections: Set up SSH keys and scripts to automate repetitive tasks.
- Stay Secure: Always use strong passwords and keep your private key safe.
These tips will save you time and make your SSH experience smoother. Trust me, you’ll thank yourself later.
Tools and Alternatives
While Terminal is the go-to tool for SSH, there are other options if you prefer a graphical interface:
1. PuTTY (for Windows Users)
If you’re on Windows, PuTTY is a popular SSH client that offers a user-friendly interface.
2. MobaXterm
This is another great option for Windows users, offering advanced features like X11 forwarding and SCP support.
3. Cyberduck
For Mac users who prefer a GUI, Cyberduck is a solid choice for managing SSH connections.
But hey, if you’re rocking a Mac, why complicate things? Terminal’s got your back.
Security Best Practices
Security is key when using SSH. Here are some best practices to keep your connections safe:
- Use Strong Passwords: Avoid using simple passwords that can be easily guessed.
- Disable Root Login: Prevent unauthorized access by disabling root login via SSH.
- Use Public Key Authentication: It’s more secure than password-based authentication.
- Keep Your Software Updated: Regularly update your operating system and SSH client.
By following these practices, you’ll ensure that your SSH connections remain secure and reliable.
Troubleshooting Common Issues
Even the best-laid plans can go awry. Here are some common SSH issues and how to fix them:
- Connection Refused: Check your server’s firewall settings to ensure SSH is allowed.
- Authentication Failed: Double-check your username, password, and SSH keys.
- Timeout Errors: Ensure your internet connection is stable and the server is online.
If all else fails, consult the server’s logs for more information. Sometimes, the answer’s right there in front of you.
Conclusion
And there you have it—a comprehensive guide on how to use SSH remote on Mac for free. From setting up SSH to generating keys and connecting to remote servers, you’ve got all the tools you need to master this essential skill.
Remember, SSH isn’t just about typing commands—it’s about staying secure, efficient, and in control of your remote systems. By following the tips and best practices outlined in this guide, you’ll be well on your way to becoming an SSH pro.
So what are you waiting for? Fire up your Terminal and start exploring the world of SSH. And don’t forget to share this article with your friends—knowledge is power, after all!