**Hey there, tech enthusiasts! Are you ready to dive into the world of remote IoT device access? Imagine being able to connect to your devices from anywhere in the world, without breaking the bank or dealing with complex setups. Well, buckle up because we’re about to show you how to remotely access IoT devices using SSH over a web interface—completely free on AWS!**
In today’s fast-paced digital era, IoT devices are everywhere. From smart homes to industrial automation, these gadgets are revolutionizing the way we live and work. But what happens when you need to manage them remotely? Sure, you could set up expensive hardware or pay for premium services, but who has time for that? That’s where our guide comes in—providing a step-by-step walkthrough of how to securely access your IoT devices via SSH through a web browser, all powered by AWS’s free tier.
Whether you’re a hobbyist tinkering with Raspberry Pi or a professional managing an entire fleet of IoT devices, this article will equip you with the knowledge and tools to get the job done. Let’s make it happen!
Read also:Jim Parsons The Remarkable Journey Of A Beloved Actor
Table of Contents:
- Introduction to Remotely Accessing IoT Devices
- Why Use AWS for Free Remote Access?
- Understanding SSH and Its Role in IoT
- Setting Up AWS for IoT SSH Access
- Creating a Web Interface for SSH
- Ensuring Security for Remote Connections
- Common Issues and How to Fix Them
- Optimizing Your IoT SSH Setup
- Tools and Resources for IoT Management
- Wrapping It Up
Introduction to Remotely Accessing IoT Devices
Let’s face it—IoT devices are awesome, but they can be a pain to manage if you’re not physically near them. Imagine having a smart irrigation system in your backyard that needs troubleshooting or a security camera at your office that requires configuration changes. Sure, you could drive over every time something goes wrong, but ain’t nobody got time for that!
Remotely accessing IoT devices is the solution. By setting up SSH (Secure Shell), you can securely connect to your devices from anywhere in the world. And guess what? You don’t even need fancy hardware or expensive subscriptions. With AWS’s free tier, you can host everything you need to create a seamless remote access experience.
But why stop there? Why not take it a step further and make it accessible via a web browser? That way, you don’t have to worry about downloading software or dealing with complicated terminal commands. Sounds good, right? Let’s break it down.
Why Use AWS for Free Remote Access?
Amazon Web Services (AWS) is like the holy grail of cloud computing. It offers a ton of features, including a free tier that’s perfect for small projects like ours. Here’s why AWS is the best choice for remotely accessing IoT devices:
- Free Tier: AWS provides a generous free tier that includes EC2 instances, which are perfect for hosting SSH servers.
- Scalability: If your project grows, AWS can easily scale up to handle more devices and traffic.
- Security: AWS takes security seriously, offering robust features to protect your data and devices.
- Global Reach: With data centers all over the world, AWS ensures low latency and fast connections no matter where you are.
So, if you’re looking for a reliable, cost-effective way to manage your IoT devices remotely, AWS is the way to go.
Read also:Unveiling The Timeless Legacy Of Jeanette Nolan Her Life Career And Impact
Understanding SSH and Its Role in IoT
What Exactly Is SSH?
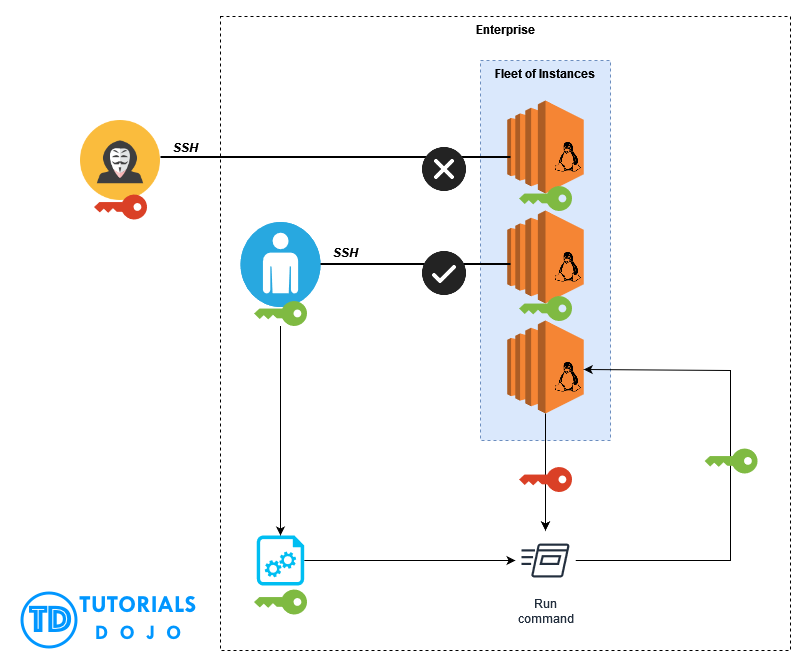
SSH, or Secure Shell, is like a secret tunnel that lets you securely connect to remote devices. It encrypts all data sent between your computer and the target device, ensuring that no one can snoop on your activities. For IoT devices, SSH is essential because it allows you to manage them remotely without compromising security.
Why SSH for IoT?
IoT devices often lack built-in interfaces for management, making SSH the perfect solution. Here’s why:
- Secure: SSH uses encryption to protect your connection from prying eyes.
- Efficient: It’s lightweight and doesn’t require much bandwidth, making it ideal for resource-constrained IoT devices.
- Flexible: You can perform a wide range of tasks over SSH, from running commands to transferring files.
Now that you understand the basics, let’s move on to setting things up.
Setting Up AWS for IoT SSH Access
Alright, let’s get our hands dirty! The first step is setting up AWS to host your SSH server. Here’s how you do it:
- Create an AWS Account: If you don’t already have one, sign up for AWS and activate the free tier.
- Launch an EC2 Instance: Choose a Linux-based AMI (Amazon Machine Image) and configure it according to your needs.
- Set Up Security Groups: Configure security groups to allow SSH access from your IP address.
- Install SSH Server: Once your instance is up and running, log in and install an SSH server if it’s not already installed.
Voilà! You now have a secure SSH server running on AWS. But wait, there’s more!
Creating a Web Interface for SSH
Why a Web Interface?
While SSH is great, it’s not exactly user-friendly for everyone. By creating a web interface, you can simplify the process and make it accessible to anyone with a browser. Plus, it’s just plain cool!
How to Do It?
There are several ways to create a web interface for SSH, but one of the easiest is using a tool like WebSSH2. Here’s how:
- Install WebSSH2: Use npm (Node Package Manager) to install WebSSH2 on your EC2 instance.
- Configure WebSSH2: Set up WebSSH2 to connect to your IoT devices via SSH.
- Secure Your Web Interface: Use HTTPS and authentication to protect your web interface from unauthorized access.
With WebSSH2, you can access your IoT devices from any device with a browser, making remote management a breeze.
Ensuring Security for Remote Connections
Security is key when it comes to remote access. You don’t want some random hacker taking control of your smart home, do you? Here are some tips to keep your setup secure:
- Use Strong Passwords: Avoid using weak or default passwords for your IoT devices and SSH server.
- Enable Two-Factor Authentication: Add an extra layer of security by requiring a second form of authentication.
- Limit Access: Restrict SSH access to specific IP addresses or use a VPN for added security.
- Keep Software Updated: Regularly update your IoT devices and SSH server to patch vulnerabilities.
By following these best practices, you can ensure that your remote access setup is as secure as possible.
Common Issues and How to Fix Them
No matter how careful you are, issues can still arise. Here are some common problems you might encounter and how to solve them:
- Connection Refused: Check your security groups and ensure that SSH is allowed from your IP address.
- Authentication Failed: Double-check your username and password, and make sure your SSH keys are set up correctly.
- Slow Connection: Optimize your SSH configuration and consider using a faster data center.
If you’re still stuck, don’t hesitate to reach out to the AWS support community or consult the official documentation.
Optimizing Your IoT SSH Setup
Once everything is up and running, it’s time to optimize your setup for maximum performance. Here are a few tips:
- Automate Tasks: Use scripts to automate repetitive tasks and save time.
- Monitor Usage: Keep an eye on your AWS usage to avoid unexpected charges.
- Document Everything: Create a detailed guide for yourself (and others) to make future troubleshooting easier.
With a little fine-tuning, your IoT SSH setup will be running like a well-oiled machine.
Tools and Resources for IoT Management
There are tons of tools and resources available to help you manage your IoT devices. Here are a few worth checking out:
- Home Assistant: A popular open-source platform for managing smart home devices.
- Node-RED: A flow-based programming tool for wiring together IoT devices.
- AWS IoT Core: A managed cloud service for connecting and managing IoT devices at scale.
These tools can complement your SSH setup and provide even more functionality for managing your IoT ecosystem.
Wrapping It Up
And there you have it—a comprehensive guide to remotely accessing IoT devices using SSH over a web interface, all powered by AWS’s free tier. Whether you’re a seasoned pro or a complete beginner, this setup offers a secure, cost-effective way to manage your IoT devices from anywhere in the world.
So, what are you waiting for? Grab your laptop, fire up AWS, and start setting things up. And don’t forget to share your experience with us in the comments below. Who knows? You might even inspire someone else to take the leap into the world of remote IoT management!
Stay connected, stay secure, and keep innovating. The future of IoT is in your hands!