Hey there, tech enthusiasts! Ever found yourself scratching your head trying to figure out how to connect to your IoT devices from anywhere using a Windows 10 command line without breaking the bank? Well, you’re not alone. The world of IoT (Internet of Things) is growing like crazy, and remote access is becoming a must-have skill for both hobbyists and professionals alike. In this guide, we’ll dive deep into how you can set up IoT SSH from anywhere, completely free, using just your Windows 10 command line. Stick around because this is gonna be a wild ride!
First things first, let’s break down what IoT SSH from anywhere free even means. Imagine being able to control your smart home devices, servers, or remote gadgets from literally anywhere in the world without paying for premium services. Sounds too good to be true, right? But guess what? It’s totally possible with the right tools and a bit of know-how. This guide will walk you through every single step, so even if you’re a complete newbie, you’ll be rocking this in no time.
Now, before we dive into the nitty-gritty, here’s a quick heads-up: this isn’t just another generic tutorial. We’re gonna get down to the real deal—practical, actionable steps that you can start implementing today. So grab your favorite beverage, hit that command line, and let’s get to work. Are you ready to level up your IoT game? Let’s do this!
Read also:Unlock The Power Of Mydasi Your Ultimate Guide To This Revolutionary Innovation
Table of Contents
- Introduction to IoT SSH from Anywhere
- Tools You Need to Get Started
- Why Windows 10 is Perfect for IoT SSH
- Setting Up an SSH Server on Windows 10
- Understanding Port Forwarding
- Dynamic DNS: The Magic Behind Remote Access
- How to Use SSH Client on Windows 10
- Securing Your IoT SSH Connection
- Common Issues and Troubleshooting
- Wrapping It All Up
Introduction to IoT SSH from Anywhere
Alright, let’s start with the basics. What exactly is IoT SSH from anywhere free? Simply put, it’s the process of remotely accessing your IoT devices over the internet using SSH (Secure Shell) without paying for expensive services. SSH is a protocol that allows you to securely communicate with remote devices through encrypted connections. It’s like having a secret tunnel that only you can use to control your devices.
But why is this important? Well, imagine you’re on vacation and you want to check if you turned off your smart thermostat or if your security camera is working fine. Or maybe you’re a developer who needs to debug a remote server. With IoT SSH from anywhere, you can do all of this and more, right from your Windows 10 command line.
And the best part? It’s completely free! You don’t need to shell out money for premium services or subscriptions. All you need is a bit of setup and some free tools that we’ll cover in this guide. So buckle up because we’re about to unlock the power of remote access!
Tools You Need to Get Started
Essential Tools for IoT SSH
Before we dive into the setup process, let’s talk about the tools you’ll need. Don’t worry; most of these are either built into Windows 10 or completely free to download. Here’s a quick list:
- Windows 10: Make sure you’re running the latest version of Windows 10. This is crucial because newer versions come with built-in SSH capabilities.
- OpenSSH: This is the core tool you’ll use to set up your SSH server. It’s already included in Windows 10, but we’ll show you how to enable it.
- Dynamic DNS Service: Since your home IP address might change, a dynamic DNS service will help you maintain a stable connection. We’ll recommend some free options later.
- Port Forwarding: You’ll need to configure your router to forward SSH traffic to your Windows 10 machine.
These tools might sound intimidating, but trust me, they’re easier to set up than you think. Plus, once you’ve got them running, you’ll have a powerful remote access system at your fingertips.
Read also:Iradha The Rising Star You Need To Know About
Why Windows 10 is Perfect for IoT SSH
Windows 10 is like the Swiss Army knife of operating systems when it comes to IoT SSH. Why? Because it comes with built-in support for OpenSSH, which makes setting up an SSH server a breeze. No need to install third-party software or mess around with complicated configurations. Plus, the command line interface in Windows 10 is robust and powerful, giving you full control over your SSH connections.
Another great thing about Windows 10 is its compatibility with a wide range of IoT devices. Whether you’re working with Raspberry Pi, Arduino, or any other smart device, Windows 10 can handle it. And let’s not forget the massive community of Windows users who are always ready to help if you run into any issues.
So if you’re already using Windows 10, you’re in luck. You’ve got everything you need to get started with IoT SSH from anywhere. Let’s move on to the next step!
Setting Up an SSH Server on Windows 10
Enabling OpenSSH on Windows 10
Alright, let’s get our hands dirty. The first step in setting up IoT SSH from anywhere is enabling the OpenSSH server on your Windows 10 machine. Here’s how you do it:
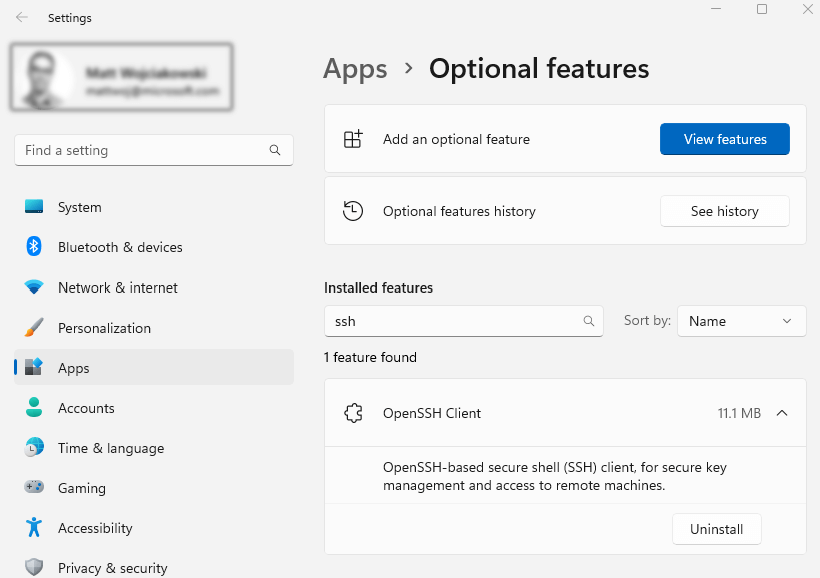
- Open the Start menu and go to Settings > Apps > Optional Features.
- Click on Add a feature and search for OpenSSH Server.
- Select it and click Install. This might take a few minutes, so grab a snack while you wait.
Once the installation is complete, you’ll need to start the SSH service. Open a command prompt with admin privileges and type:
net start sshd
That’s it! You’ve now got an SSH server running on your Windows 10 machine. But wait, there’s more. You’ll also want to configure the SSH settings to make sure everything runs smoothly. We’ll cover that in the next section.
Understanding Port Forwarding
Port forwarding is like the secret sauce of remote access. It allows you to direct incoming traffic from the internet to a specific device on your local network. In this case, we want to forward SSH traffic (which uses port 22 by default) to your Windows 10 machine.
Here’s how you can set up port forwarding on your router:
- Log in to your router’s admin panel. This usually involves typing your router’s IP address into a browser.
- Find the Port Forwarding section. It might be under Advanced Settings or Network Settings.
- Create a new rule and set the external port to 22 (or any other port you prefer). Set the internal IP address to your Windows 10 machine’s local IP address.
And just like that, you’ve opened the door for remote access. But remember, security is key, so make sure to lock down your SSH settings to prevent unauthorized access.
Dynamic DNS: The Magic Behind Remote Access
Now, here’s where things get really interesting. Your home IP address is likely to change from time to time, which can make remote access a real pain. That’s where dynamic DNS comes in. A dynamic DNS service assigns a fixed domain name to your changing IP address, so you can always connect to your devices no matter what.
There are plenty of free dynamic DNS services out there, such as No-IP and Dynu. Most of them offer easy-to-use software that automatically updates your domain name whenever your IP address changes. Just download the software, set it up on your Windows 10 machine, and you’re good to go.
With dynamic DNS in place, you can access your SSH server from anywhere using a simple domain name instead of a complicated IP address. It’s like having a personal URL for your home network.
How to Use SSH Client on Windows 10
Connecting to Your IoT Devices
Now that your SSH server is up and running, it’s time to connect to your IoT devices. The good news is that Windows 10 comes with a built-in SSH client, so you don’t need to install anything extra. Here’s how you can use it:
- Open the command prompt and type ssh username@your-domain.com. Replace username with your actual username and your-domain.com with your dynamic DNS domain.
- When prompted, enter your password. If you’ve set up key-based authentication (which we’ll cover later), you won’t need to enter a password.
- Voila! You’re now connected to your IoT device from anywhere in the world.
Simple, right? But wait, there’s more. Let’s talk about securing your SSH connection so you can rest easy knowing your data is safe.
Securing Your IoT SSH Connection
Security should always be a top priority when it comes to remote access. The last thing you want is for someone to hack into your IoT devices and wreak havoc. Here are a few tips to keep your SSH connection secure:
- Change the Default Port: Instead of using the default port 22, consider changing it to something less obvious. This will make it harder for attackers to find your SSH server.
- Use Key-Based Authentication: Instead of relying on passwords, set up key-based authentication. This involves generating a public/private key pair and using the private key to log in.
- Disable Root Login: Never allow root login over SSH. Create a separate user account with limited privileges instead.
By following these simple steps, you can significantly reduce the risk of unauthorized access and keep your IoT devices safe and secure.
Common Issues and Troubleshooting
Even with the best setup, things can sometimes go wrong. Here are a few common issues you might encounter and how to fix them:
- Connection Refused: This usually means your SSH server isn’t running or your port forwarding isn’t set up correctly. Double-check your settings and make sure everything is configured properly.
- Authentication Failed: If you’re having trouble logging in, check your username and password. If you’re using key-based authentication, make sure your private key is correctly set up.
- Timeout Errors: This could be due to a firewall blocking your connection or your dynamic DNS not updating properly. Try restarting your router or checking your DNS settings.
Don’t get discouraged if you run into problems. With a bit of troubleshooting, you’ll have your IoT SSH connection up and running in no time.
Wrapping It All Up
And there you have it, folks! You’ve now got all the knowledge and tools you need to set up IoT SSH from anywhere free on Windows 10 using the command line. From enabling the OpenSSH server to securing your connections, we’ve covered everything you need to know to take your IoT game to the next level.
Remember, the key to success is practice. The more you play around with SSH and remote access, the more comfortable you’ll become. So don’t be afraid to experiment and try new things. And if you ever get stuck, there’s a whole community of IoT enthusiasts out there ready to help.
Now it’s your turn. Take what you’ve learned and start building your own remote access system. And don’t forget to leave a comment below and let us know how it goes. Happy hacking, and see you in the next guide!